Building a Telehawk
PG2
Well, before I can do much more, I need
to go back and finish roughing out the neck.
I'm going to start by routing the trussrod
channel. For this guitar I'm installing a double action trussrod(sourced
from Stew Mac), for a couple of reasons. First, it is the
simplest to install. It only requires a straight, flat
bottomed , channel 1/4 wide by 18 1/4 long, and a bit
under 1/2" deep. Other traditional trussrods require
the rout to have a curved bottom; that requires additional
jigs and we want to keep this simple. Additionally, the fact
that it can bend a neck up as well as back gives a little
more room for errors (but still not much).
First thing to do is mark out where on
the neck the ends of the trussrod will be located. I want
the adjustment nut to be right at the back edge of the nut,
or just under the nut, to ease access. Once the ends are marked,
these lines are transferred to the back of the neck blank.
Now, with the router table setup with the
1/4" bit, carefully mark the fence at each side of the
router bit (not the bit's centerline).
The marks are in red, and a little hard
to see, sorry about that.
Now, if you did as directed earlier, one
side of your neck blank is parallel the neck's centerline.
On the first neck I started, it was on mine as well. Unfortunately,
I am suffering a shortage of quartersawn stock, and I couldn't
fit it quite right on the piece I had remaining. Not a big
deal, I just cut a tapered shim and attached it to the side
which will ride along the fence with double stick tape.

Now the table is set so that the bit's
center is the same distance from the fence as the neck centerline
is from the edge. The next step is to rout the trussrod channel
(in multiple passes). Make certain to move the blank in the
direction which will cause the cutter to pull the wood against
the fence(typically right to left). If run in the other direction,
it will tend to push the blank away from the fence and wander.
The bit is extended above the table just
under 1/4", and the router turned on. The blank is then
lowered on top of the bit so that the first alignment mark
lines up with the mark on the fence to the left of the bit
(when going right to left, see picture above). The blank is
slid along until the second alignment mark lines up with the
mark on the fence at the right edge of the bit, and the router
turned off. Once the router quits turning check the rout,
and if it's ok, raise the bit and repeat.
I went to 1/2" to allow me a little
room to level the surface which the fretboard will be glued
to. I also squared the butt end of the rout with a 1/4"
chisel, but it's not necessary.

It should now look like the picture above.
Next step is to cut out the profile on
the remaining side. But first, I want to ensure my
taper will suit the bridge and nut width desired. I do this
by roughly marking the locations of the two E strings at the
nut line and checking that the nut width(typically 1 11/16ths)
is marked correctly. I then mark the location of the bridge
(it should fall on the neck blank). The bridge I'm using has
a 52mm saddle spacing (measured, but it's generally either
50 or 52mm) I mark the two E strings locations at the bridge
(angle is not important now) and draw lines between the bridge
marks and nut marks, basically drawing in the E strings. I
then draw lines parallel to the E strings for the fretboard
edges allowing enough space that the strings won't fall off
the edges. Ensure that you end the taper lines where the blank
enters the body (even if you must exit at an angle). I now
have the correct fretboard taper in width for the bridge and
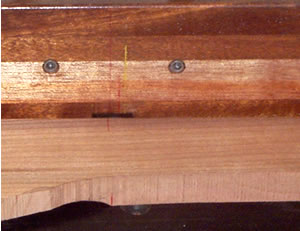
nut spacing being used. The next picture shows the strings
drawn in at the bridge end, and the squared end of the trussrod
rout.
Now that the width taper has been defined,
I profile it with the bandsaw. I set the bandsaw to approximately
30* angle and bevel the back edges, cutting almost up to the
profile edge (and always leaving a little extra room, how
much depends upon experience/comfort/skill). This is a freehand
cut, and many may not be comfortable doing this. Alternatively,
any number of saws can be used, or my preference would be
for a belt sander equipped with a very course belt.

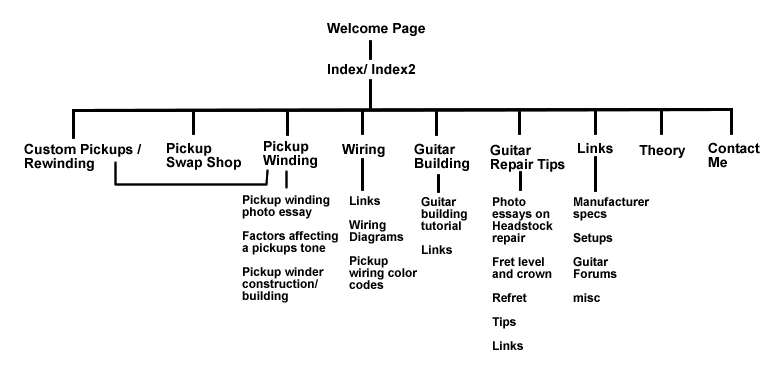
Note that the back bevels exit at the point
where the blank enters the body, and just beyond the nut.
The next step is to joint all mating faces
in the assembly( neck to body seams). This can be done with
a jointer, a router table, or a hand plane. All methods are
almost as easy , but because the neck is so much narrower
than the body pieces, these joints benefit from a simple jig
called a shooting
board when making them with a hand plane. It is important
to do this now; once the chambers are cut the body pieces
will be too flexible to joint.
Tip: When jointing boards, it is usually
beneficial to take a couple extra shavings from the center
with a hand plane. This "gap" is small enough to
easily close w/ clamping/ glueup, and provides a tighter seam
at the ends, and a little more pressure there where the wood
tends to shrink more.
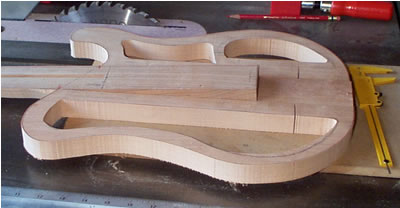
Now that all pieces mate well, I can return
to the body, and cut out the chambers and profile. Again,
I use the bandsaw, but it is also possible to do with many
other saws, or even the router (with templates). I'll now
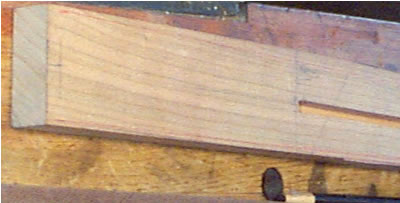
arrange all the parts to check fit and alignment.
It's starting to look like a guitar now!(the
dark line on the upper body seam is shadow) The perpendicular
lines are the entry cuts, and you can see they are located
to allow more than enough gluing surface for stability, especially
when glued to the caps on top and back. (it looks like I forgot
to make a small gap between the lower chamber and the control
cavity, I'll have to check that......)
The next step is to establish the correct
neck angle. First, I must know the height of the saddles (for
a tune-o-matic type which I'll be using, it's about 1/2")
I must know the thickness of the fretboard(1/4") and
the thickness of the top (approx. 3/8") Because my fretboard
thickness, plus height of the frets equals approximately the
thickness of the top, I can measure as if they were installed,
otherwise a few calculations would need to be made, or the
pieces laid in place to measure against.
Measuring as if they were installed, I
know I need 1/2" of height above the body blank at the
bridge location, and level at the neck to body joint.
This is the required angle for the neck
to be set so the strings run straight along the frets tops
to the bridge saddle tops. Generally 3-5 degrees, in this
case it measures 4.
Note, the neck blank will be slightly higher
above the body core on the lower bout side as it connects
to the neck a little further down than the upper bout does.
Also note, as shown the finished guitar will have the top
of the fretboard level with the top of the body where they
intersect at the upper bout. I want it higher than that so
I will raise the neck at the body junction 1/4"(thickness
of the fretboard), and reestablish the angle which gives me
1/2" height at the bridge position (now about 3 1/2 degrees).
Trace the body top along the neck blank. These measurements
mean that when the bridge is full down, the strings will be
resting on the frets. This is planned, it ensures I can get
a low enough action for the player, and allows me a little
leeway if the body ends up slightly thinner than planned (as
can easily happen).
I now make a second thickness of quartersawn
cherry and glue it to the neck blank. Ensure it extends beyond
the body far enough to carve the heel. The heel as on the
prototype is not absolutely necessary, and in some designs
would be unwanted (i.e. LP Junior) In those cases, the neck
sits above the back of the guitar the thickness of the. In
the interest of simplifying things, this is the method I'll
use.
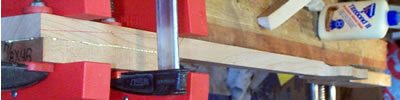
Glue-up, note the body line on the edge.
Page
1
2 3
4 5
6
7