Building a Telehawk
OK, I'm going to share with you how I build
a guitar. It's not the only way to do it, it's just what works
for me. For this essay I'm going to build a Telehawk, just
because I need to build one anyway(seems I may never get the
prototype back ;^). This method of construction is easily
modified to suit almost any style of guitar. As this is a
hobby job for me, I will do the work and update this section
on an approximately weekly schedule.
A little about tools:
I have, or have access to a full shop with
all the tools, but almost everything here can be done with
a few simple tools. To me the essentials are a small band
saw or scroll saw (can be done without), a belt sander (can
be done without), an orbital palm sander (can be done without),
a good med. weight router(probably can be done without), a
small drill press, and a small table saw (10" preferred)
that's about it. Where other methods are usable Vs the method/tool
I'm using I will try to point out alternatives.
Templates:
The first thing we
need are templates. I built these throughout the process of
building the prototype, so I have a bit of an advantage here.
However, you can simply trace and "assemble" templates
from an existing guitar. (You might note the fancy body template,
that's what happens when you work until 4am in the morning
;^) I recessed the wrong side of the top when building the
prototype.) You can make your templates from tempered hardboard,
3/8" thick, or glue up too layers of 1/4". I recommend
the latter, and if you plan on using them more than once,
you may want to treat the edges of the templates with thin
superglue. The glue will be absorbed and harden the edges
further so they will wear less.
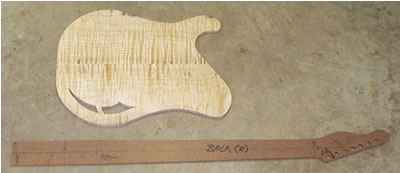
The neck template is already marked with
all critical information to include fretboard start and stop
points, nut placement, centerline, trussrod location, where
the body line crosses, and because this is really a neckthru,
bridge location and correct bridge angle for the 25"
scale length. (You may also note there are 7 tuner holes,
you probably can't read the big "wrong" marked on
it ;^). The template is also labeled "front" and
"back".
Beginning the project:
First, I select a board suitable for the
neck. (I build most of my guitars with cherry, so other than
the top and fretboard, all wood for this project is cherry.
All the wood I'm using was aged, cut and kiln dried to 6%
moisture, and then acclimated to the shop) I look for a nice
straight quartersawn board of suitable size. I think quartersawn
is the only choice if you want the greatest strength and reliability,
but you don't usually get any figure in quartersawn. (flatsawn
may be as reliable with a good finished neck, but I'm not
going to go through all this to find out I have an unstable
piece; besides, I want to be confident for years to come)
I chose a piece of 4/4 (7/8" thick) for the blank as
it is approximately the right thickness (believe it or not
a bolt-on neck minus the fretboard is approx. 3/4" thick
at the heel, thinner where contoured) I will be using a straight
headstock due to it's simplicity and inherently greater strength.
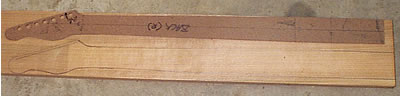
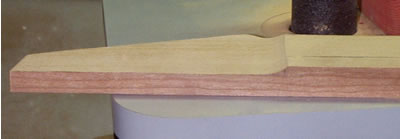
Next I will profile ONE side. I used an
inexpensive (approx. $100.00) table top bandsaw. You could
also use a scroll saw, a jig saw, a saber saw (leave a lot
of extra), or if you really want to do it hard, a coping saw
/hand saw. On all cuts, "leave the line" to allow
for final fitting/shaping.

It is important to only profile one side
as the straight side will be used to run against the fence
on the router table to rout the trussrod channel. The straight
side needs to be parallel to the neck centerline. Now, boldly
mark both sides of the neck blank as "front" and
"back". I neglected this step.
I now thickness the headstock, first marking
the location of the nut. I cut off the excess with the bandsaw
and then use an oscillating spindle sander to sand the face.
I clamp a board to the table as a fence, and run the flat
side of the neck blank against the table.
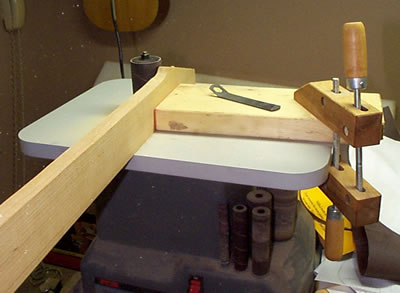
I make multiple passes until I get the
correct thickness (5/8"), and the drum leaves me a nice
curve meeting fretboard level where the nut location was marked.
OK, remember where I noted I neglected
to mark "front" and "back"? That's right,
I just made my blank into a left handed neck to go with my
left handed top from the prototype! (eventually I'll have
a complete lefty ;^)
You will note it's not perfect, but it
is very close. Before I came up with the setup for the oscillating
spindle sander. I did this freehand w/ a small belt sander.
Of course, rasps and sanding blocks can do the job with enough
work. Another option is to use the router which will leave
a square lip. (Use other boards surrounding the blank for
the router to ride on.)
Well, I've now redone all previous steps
and have a right hand blank.
The next logical step would be to rout
the trussrod channel, but since I can't get to the router
table right now I'll let it wait and move on to making the
body.
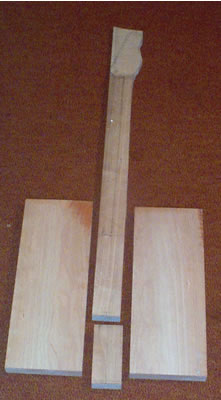
Select pieces of wood of suitable thickness
for the body (I'm using slighty over 1" as I will have
3/8" thick top and back caps. A strat type is typically
aprox 1 3/4- 1 7/8"s thick. This body will end up aproximately
1 5/8" to be a little thinner/lighter) At some point
prior to continuing I need to have cut the sides of the neck
blank to width, without taper, where it will be joined to
the body wings.
I simply align the center line of the neck
and body templates to determine the joining point I desire
(based upon fret access, adequate bolting surfaces etc) and
mark the neck template w/ the line and then transfer that
line to the neck blank. Then, from the edges of the neck outline
at the joining point to the butt end of the neck blank, straight
lines are drawn parallel to the neck centerline, and cut on
the tablesaw (leave the lines to allow for planing the joining
faces later). Before moving on cut a piece of body wood to
the same width.
Select suitable pieces for the "wings".
This arrangement/ method of construction is very similar to
that used by Jim Jaros and McNaught. This method has the advantage
of not having any of the seams line up. The top and back cap
seams fall along the centerline resulting in much stronger
construction, similar to a brick wall. Guitar building is
the only form of construction I know where someone will tell
you it's ok to have seams line up in multiple layers (it's
not ok in cabinetry or carpentry or masonry or......)
I don't buy it. It may be adequate, but it certainly is not
ideal. Additionally, because all significant parts of the
vibration path/ tone path are directly attached to the neck
(nut, bridge, pickups, etc) it acts like a guitar carved entirely
from one piece of wood more than any other multi-piece design.
The neck could be done as a complete neckthru;
however, I typically use a 2 piece heel just for comfort and
cosmetics (I could do without it, but it would leave a sharp
transition from neck to body) A two piece neckthru would likely
have a visible glueline and misaligned grain at the butt end
(it is very difficult to get the grain on a two piece
glue up to lign up well at both ends. I want the best
possible alignment of the grain at the heel)
I could go with a board which is the full
thickness (plus some) but that is more costly, and the wood
has a greater chance of moving when the neck is shaped.(Either
right away, or over a period of days or months). That could
be disastrous!
I next arrange and mark the pieces. Mark
a centerline down the neck blank, and extend that line to
the end of the body blank. Draw a centerline on the body template
and align it over the body pieces with the neck centerline,
Trace the body outline, and mark for cutouts. Doing it this
way makes certain the body is centered on the neck centerline,
and not on glue seams or other less accurate/ relevant guides.
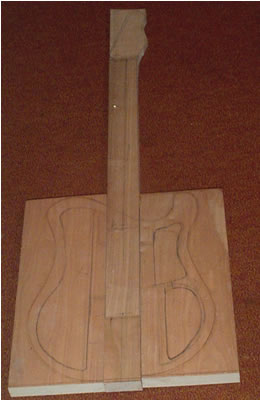
The Telehawk is a thinline design with
the pickups mounted to the body and stringthru contstruction(I'm
considering installing a Jaguar type tremolo...any opinions?).
I make sure to draw the cutouts to allow
the bridge posts, string ferrules, pickup screws etc. to mount
into the full thickness of wood, and I allow a bit extra (exact
spacing was determined/learned when I built the prototype.
A bit more wood could be removed here and there, but you need
to leave enough that the guitar doesn't become neck heavy)
Also note the small gap between the sound
chamber and the control cavity in the lower bout. This will
make it easy for me to install pickups by simply drilling
through the side of the pickup routs into the chambers. I
work in this order as I find it much easier to cut the chambers
on the bandsaw(scroll saw, jigsaw etc.) before gluing it all
together Vs routing the chambers in the assembled body.
The entry cut is small and is made at the
end of the neck (on the INSIDE of the wings) to allow maximum
continuous contact for vibration transfer and strength. For
more of a hollow body design, wood can be removed from along
the neck to body seam. With this design all wood of the wings
centers can be removed as long as you leave wood for the bridge
and string thru ferrules to contact and for mounting the control
cavity backplate to. It will still balance well (the prototype
was built that way). Removing more wood along neck to wing
joints also has the advantage of having less wood to join,
making seams easier to get very tight.
Page
1 2
3 4
5 6
7