Repair
Tips
Installing
a pickup in a finished body
a how to
photo essay on routing a finished body to accept a pickup,
in this case a humbucker...
Working
on a hollowbody: attach
dental floss or heavy thread to pots/switches/jack prior to
pulling them out through pickup hole, Makes it much easier
to get them back in place.
Nut
slots too deep:
Take a course file and file the top of the nut 1/2 the distance
you want to raise the slots. Catch the filings on a piece
of paper. Tape both sides of the nut with masking tape and
then fill the slots with the filings. Soak the filings with
thin superglue. Press into place with a toothpick. When dry,
refile the slots. The slots should be made so the string sits
in about 1/2 to 3/4 thier diameter. Slots should be wider,
and taper downwards on tuner side. Square slots are acceptable.

Nut
slotting feeler guages: Need
an inexpensive and accurate way to cut nut slots? Get a set
of feeler guages, clamp them together in a vise and file teeth
into them. You can now use them as nut files w/ unlimuted
width selection! Tip submitted by Harold Wyman (thanks!)
Cutting
a nut:
Theres a good photo essay on the guitar notes site (acoustic)
on making a nut. see links page
Tuning
Instabily:
Problems with tuning stability are almost always cuased by
improper tuning technique (always tune UP to the note) or
a binding nut. (There are RARE occasions where the string
isn't seating correctly at the bridge, and we're not considering
problems with set up regarding a tremolo) Even the cheapest
geared tuners don't "slip" as a rule. If a geared
tuner is failing it will make a "poping" type of
sound as the gear jumps teeth. If the gears are loose, it
is possible to pull a string flat with extensive (excessive?)
use of a tremolo. If notes are going sharp it is due to the
nut binding. What happens is excessive tension builds up between
the tuner and the nut in order to overcome the binding. Then
as you play the vibration of the string allows it to wiggle
through the slot equalizing the tension, and making the string
sharp. See above for info on a binding nut. If a fretted note
is sharp it is an indication that the nut slots are not deep
enough (or excessive presure with high frets/ scalloped or
worn fretboard). If a string is going flat, it is always bridge
related. Either a problem with the string seating fully (common
w/ trapeeze tailpieces and ball ends in vintage tremolos (the
reason they came up w/ bullet ends)) or binding on a rough
saddle/ the edge of the trem block. Again, it is possible
to cause a tuner to back off with extream tremolo, but rare.
Shimming
a neck: The best
shims are one piece and the full size of the neck pocket.
For this veneer from the hardware store works well. However,
it is very hard to get an even taper on these. The next best
option is to use masking tape. Masking tape is paper which
is wood fiber so it's almost as good as a solid shim, and
much better than the smaller shims which leave large gaps
which impedes the transfer of vibration, and could cause problems
later on. To make a tape shim, lay strips of tape side by
side perpendicular to neck, and add layers to provide the
taper. i.e. stripe 1- 1 layer, stripe 2- 2 layers, stripe
3- 3 layers. Place the neck in the pocket, mark outline of
pocket, and trim just inside outline.
Stripped
holes:
small holes without much tension on them (i.e. pickguard screws)
can be repaired with super glue (gel stuff). Put some glue
in the hole and screw the screw in about 1/2 way. The glue
will not stick to the plated screw, and will form threads.
More severely stripped holes or holes w/ more tension on them
(i.e. strap button screws) require pieces of toothpick be
glued in w/ wood glue. Larger holes w/ alot of tension (i.e.
neck mounting screws) require the hole be drilled out and
a hardwood dowel glued in place.
Enlarging/
Drilling Holes:
Often required to upgrade tuners, or occasionally to change
control pots. Enlarging a hole in wood seems simple enough,
and it is. But it's also an easy way to ruin the finish of
the guitar and worse. The problem is because there is no wood
in the center of the hole, the edges pull upwards instead
of cutting. It often results in large ammounts of chipout
or worse. The answer is to run the drill BACKWARDS. This will
ream the hole out without the risk of chipping. If the hole
needs to be made significantly larger, it is often best to
use a bit one size up from the desired hole size and run it
backwards till the drill has gone just below the surface.
Now you can drill the desired size hole normally relatively
safely. The washers or dress rings will hide the slightly
larger starting bevel that remains. Whenever possible, drill
half way through from both sides or clamp a "backer board"
in place. Do NOT use much pressure on the drill, let it do
the work, excess pressure is usually due to dull bits, and
almost always results in some king of damage. If you must
drill through the finish where there is no hole use the same
method as described for significantly increasing the size
of a hole, but apply masking tape over where the hole will
be drilled prior to starting.
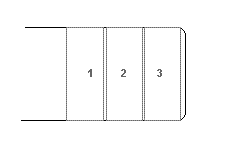
Shop
Built Sanding Tube: Here's
a simple sanding block to make for sanding inside curves.
Cut two pieces of pvc pipe to the desired length. Take one
piece and cut it lengthwise so it is slightly more than half
round. 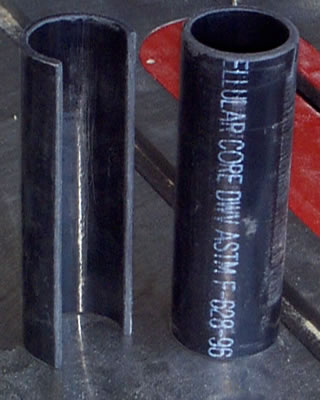
Now
just wrap the paper around the 3/4 section, and snap it around
the whole piece.

I
used 1-1/2" pipe and wound up with a final size of 2-1/4"
Paint
chips and cracked binding:
Common on older instruments. Over time these openings will
collect sweat, polish, and dirt, causing discoloration, lifting
of the edges, and further deterioration. It is best to clean
these spots w/ naptha (lighter fluid)or alchohol, remove any
loose edges around the chips before cleaning (they will be
holding polish and grime preventing the glue from working),
then seal the chips and cracks with thin superglue. Super
glue can be heated in the microwave for a few seconds (plastic
bottles) to make it flow better. Drop Filling is a technique
for filling chips with paint. This is covered at the ReRanch
site.
Never
clean a guitar with a solvent stronger than naptha or alcohol.
Acetone will eat laquer in a matter of seconds!
Always
use the smallest tool that fits the job (i.e. large tipped
jewelers screwdriver -vs- small tipped large screwdriver)
the smaller tools will help prevent you from applying too
much pressure, stripping things. Never force anything!
Here's
a cool tip: If
you ever needed to compare sizes between two items, say tuner
shafts and a drill bit, but don't have a micrometer, try this.
Use a crescent wrench! adjust the jaws to fit the first item,
and then see how the other piece fits! Also great for taking
measurements of something round. Fit the wrench to the object,
and then lay the tool on a ruler and measure the gap. It's
much more accurate!
Another
really cool tip:
Follow this
link for an instructional on making a very simple nut
spacing ruler that works for all situations!
Inadvertantly
turning down the volume:
Make it a bit harder to turn by placing a felt washer (hardware
store) between the knob and pickgueard.
Stripped
pickup mounting holes:
May be repairable just by applying a drop of super glue gel
to the underside of the hole. If that doesn't work, take a
smallish piece of med or heavy plastic pick and superglue
it over the hole on the underside of the bobbin. Redrill an
undersized hole and thread the screw in.
Determining
the phase of pickups:
attach pickup leads to an ohm meter, and then tap on the pickup
with something metal, note direction the meter reading moves.
Also note which wire is attached to the red test lead. Attach
the nect pickup to the ohm meter, and tap on it. If ohm meter
reading moves opposite of the direction it did for the first
pickup, reverse the leads. When the meter reading moves the
same direction, not which wire is attached to the red lead.
it is the same as it was for the first regardless of it's
color (i.e."hot" or "ground")
Hum
cancelling: hum
cancellation is caused by reverse polarity, reverse winding
keeps a revrse polarity pickup in phase with a non reverse
polarity pickup. To reverse the direction of the winding,
simply swap wires, using hot as the ground and ground as the
hot. Polarity can be changed on many pickups. If the pickup
has bar magnets, simply flip them over. If the pickup uses
alnico polepiece AND has the new plastic bobbins such as is
common on Fenders, the polepieces can be pushed out with a
screwdriver and reinserted "upside down". If the
bobbin is fiber DO NOT attempt to flip the polepieces; the
wire is wrapped directly around the polepieces and will almost
certainly be damaged.
Hum:
other than singlecoil hum, it is almost certainly caused by
a ground issue, either a faulty string ground or ground connection,
or a ground loop. I highly recommend going to Star Grounding.
Shielding is also recommended. See the guitar
nuts site for more information on these topics. Single
coils are very succeptable to rf frequencies such as emitted
by flourescent lights, tv's, computers, motors etc. Also note
that high load or other appliances running on the same electrical
circuit can cause noises through your amp.
Microphonic
Pickups: Generally
this is more of a problem with covered humbuckers, and more
often than not it is caused by vibration of the cover itself.
The easiest way to determine if this is the cause is to remove
the cover. Typically there are two solder points which need
to be de-soldered. If the microphonic condition goes away,
you have four options. The first is to leave the cover off.
This will affect the tone if the metal cover is magnetic,
otherwise it will not. However, the cover does provide protection
for the pickup and I'd advise leaving it, the pickup was designed
to have a cover. Second is to have the pickup wax potted,
this involves setting up a wax pot, and there is risk of damage
to the pickup. Third is to apply a layer of silicoln inside
the cover and seat the pickup in the cover before it dries
making sure not to push it all out, but getting it up around
the sides of the pickup. This is safe, easy and effective,
but makes a mess of the pickup for future repair. (not a big
concern IMO) The fourth option is to do a partial wax potting.
Get some parafin from the grocery store. Boil a small pan
of water then remove it from the heat. Place a chunk of wax
in the cover press the wax into the holes to prevent water
getting into the cover, and hold the cover on the surface
of the water with a pair of tongs.As the wax softens spread
it around and up the sides with a spoon. Resoften the wax
until you can easily seat the pickup in the cover. This is
much safer and easier than true wax potting.
If the
microphonic problem is not due to the cover, or is with a
singlecoil pickup you have two options. First is to wax pot
the pickup. The second is to pot the pickup in something else.
Laquer was once commonly used, but it can cause a problem
with some types of insulation (disolving it) and prevents
future repair (other than full rewind). I have found a great
alternative to both. It is vinyl sanding sealer. (I'm using
Sherwin williams wood classics interior sanding sealer) This
stuff penetrates deeply, dries solidly, and allows for repairs
same as wax does. It requires no special equipment or care.
Just submerge the pickup wait till bubbles stop appearing,
pull it out and set it on a paper towel to dry. Once the excess
has run off (a minute or so) wipe off the top and bottom of
the pickup with a rag and allow it to finish drying. In it's
intended use it dries fully in an hour. I leave them overnight.